Make sure the rifle is unloaded...DUH!!! and field strip the weapon.
Pull the trigger and let the hammer go forward.
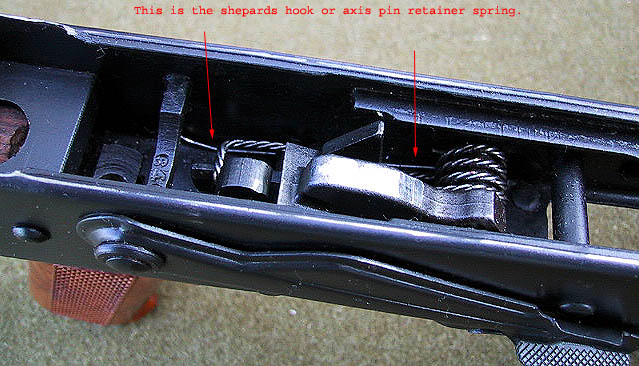
You must remove the shepards hook so you can remove the trigger
axis pin
 click the thumbnails to see the pics
full size
click the thumbnails to see the pics
full size
Push the shepards hook forward in the direction of the arrows in
the picture use a pair of needle nose pliers.
![]() Move it forward enough so you can grab
the hook end and pull it all the way out
Move it forward enough so you can grab
the hook end and pull it all the way out
![]()
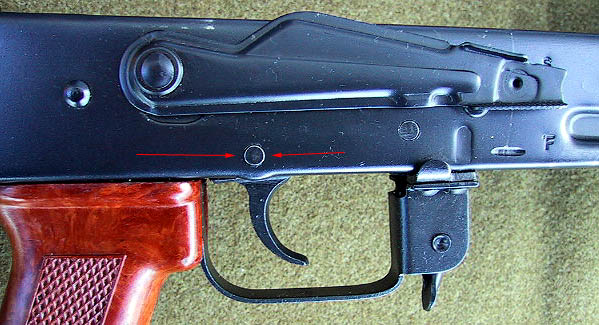
Once the hook is out, you can now use a punch to punch out the
trigger axis pin.
 The other pin on the semi auto is the
hammer pin. There is no need to remove this one to work on the disconnector.
Once the pin is out, the trigger, disconnector and disconnector spring will drop
out. Be careful, don't loose the disconnector spring. It is not under enough
tension to "jump" out, just be careful so it does'nt fall out on the floor
and get lost. Also, take note of how all these parts come out, because you need to
put them back in the same way they came out.
The other pin on the semi auto is the
hammer pin. There is no need to remove this one to work on the disconnector.
Once the pin is out, the trigger, disconnector and disconnector spring will drop
out. Be careful, don't loose the disconnector spring. It is not under enough
tension to "jump" out, just be careful so it does'nt fall out on the floor
and get lost. Also, take note of how all these parts come out, because you need to
put them back in the same way they came out.
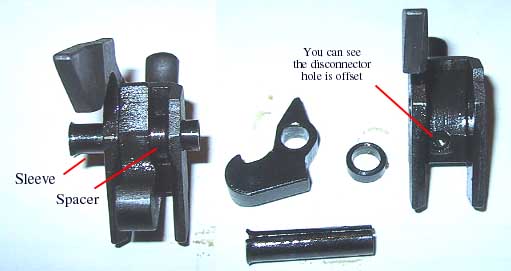
In this picture of the trigger(top view) you can see where the
disconnector is hitting the back of the trigger.
 This is what causes the trigger to
jump forward and hit your finger, causing the painful "slap"
This is what causes the trigger to
jump forward and hit your finger, causing the painful "slap"
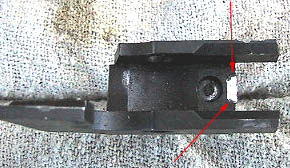
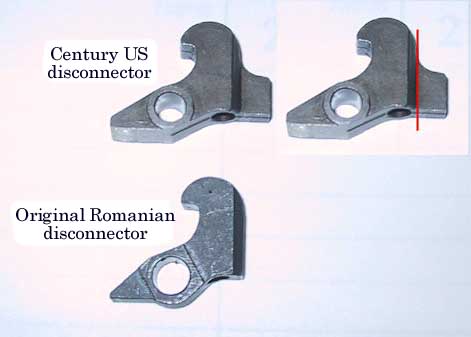
You can use a dremel tool with a cutoff wheel or a grinding
wheel to remove the material at the back end of the diconnector. That little tab is
not necessary on a semi-auto rifle. On a full auto, there is a little hook like
extension that comes off that tab. You can remove that tab completely, which is what
I have ended up doing. Make the cut where you see the vertical red line
![]() or you can shave some off the
underside of the tab, grind along the horizontal red line. Or you may do a
combination of both. The disconnector on the left is one I initially worked on.
You can see a small amount of material removed just under the red line. This
may work for you depending on how bad the slap is. I have cut off the tab on 4
rifles and have had no problems what-so-ever after doing so. This is another picture
of the underside of the disconnectors
or you can shave some off the
underside of the tab, grind along the horizontal red line. Or you may do a
combination of both. The disconnector on the left is one I initially worked on.
You can see a small amount of material removed just under the red line. This
may work for you depending on how bad the slap is. I have cut off the tab on 4
rifles and have had no problems what-so-ever after doing so. This is another picture
of the underside of the disconnectors
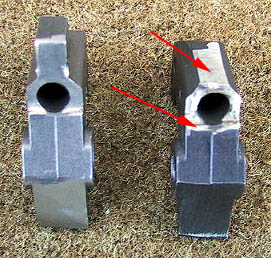 You can see on the one on the right
where I have removed material from the underside of the disconnector as well as cutting
off the tab completely. DO NOT UNDER ANY CIRCUMSTANCE REMOVE MATERIAL FROM THE FRONT
PART OF THE DISCONNECTOR. BY THIS I MEAN THE HOOK PART THAT CATCHES THE
HAMMER. THIS CAN CAUSE SLAM FIRES. Cutting off the tab may work best because
there is no danger of making the hole the spring sits in to shallow. If you remove
material from the underside of the disconnector, go slow and don't remove to much
material. If you do, the spring may not stay in the hole. I have removed quite
a bit of metal from the underside with no ill effects. I'm guessing that at some
point, the spring would not stay in but I never had that problem. Just something you
should be aware of.
You can see on the one on the right
where I have removed material from the underside of the disconnector as well as cutting
off the tab completely. DO NOT UNDER ANY CIRCUMSTANCE REMOVE MATERIAL FROM THE FRONT
PART OF THE DISCONNECTOR. BY THIS I MEAN THE HOOK PART THAT CATCHES THE
HAMMER. THIS CAN CAUSE SLAM FIRES. Cutting off the tab may work best because
there is no danger of making the hole the spring sits in to shallow. If you remove
material from the underside of the disconnector, go slow and don't remove to much
material. If you do, the spring may not stay in the hole. I have removed quite
a bit of metal from the underside with no ill effects. I'm guessing that at some
point, the spring would not stay in but I never had that problem. Just something you
should be aware of.
Thats pretty much it. Here is a picture of an original
romanian trigger group
 This is how I figured out how I could cut off the tab on the Century US part and
not hurt anything. A close up of the disconnectors
This is how I figured out how I could cut off the tab on the Century US part and
not hurt anything. A close up of the disconnectors
 Just put everything back together and go shoot. It should cure the slap
problem. The hardest part of this will be getting the shepards hook back in the
rifle, especially if you have never done it before. What I do is get the hook in
place with it laying on it's side. You can get it under the groove in both pins
this way. Once you do that, turn the hook upward so it is in place and you can push
it rearward so that it snaps over the hammer pin. Needle nose pliers are a must when
installing this hook. There is no better way for me to expalin how to get it back
in. You will just have to be patient and fiddle around with it. That's what I
did.
Just put everything back together and go shoot. It should cure the slap
problem. The hardest part of this will be getting the shepards hook back in the
rifle, especially if you have never done it before. What I do is get the hook in
place with it laying on it's side. You can get it under the groove in both pins
this way. Once you do that, turn the hook upward so it is in place and you can push
it rearward so that it snaps over the hammer pin. Needle nose pliers are a must when
installing this hook. There is no better way for me to expalin how to get it back
in. You will just have to be patient and fiddle around with it. That's what I
did.